Stubborn apps on Windows 11 rarely fail for “no reason.” More often, a background process keeps files locked, an installer service stalls, or a damaged uninstaller leaves Windows without a clean exit path. The result looks the same: a Program Won’t Uninstall message, a silent failure after clicking “Uninstall,” or a removal that finishes but leaves behind junk that keeps triggering errors. Moreover, these leftovers can create startup delays, broken shortcuts, and “phantom” entries that clutter Windows Settings and the classic Control Panel list.
Effective Uninstall Troubleshooting starts with the least risky fixes and then moves toward deeper interventions only when needed. Therefore, the best approach resembles a triage plan: stop the app’s running tasks, retry the normal uninstaller, isolate Windows in Safe Mode, and only then consider tools that remove remnants and help Clean Registry entries. A practical thread helps: imagine a small design firm where “RavenSketch,” a drawing app, refuses to leave a few workstations after a failed update. Each method below shows how that firm could restore stable PCs without turning a simple Software Removal job into a full rebuild.
- Start simple: end processes in Task Manager, then retry the built-in Uninstall Program flow.
- Use Windows paths that still work: Settings, Control Panel, and vendor uninstallers in Program Files.
- Escalate safely: boot to Safe Mode to prevent background protection modules.
- Fix installer plumbing: restart or re-register Windows Installer and run Microsoft’s troubleshooter.
- Go deep only when necessary: targeted registry cleanup and command-line removal, with backups.
- Consider a Third-Party Uninstaller: for broken uninstallers and leftover file/registry scanning.
Windows 11 Uninstall Troubleshooting: Why a Program Won’t Uninstall and What It Breaks
When a Program Won’t Uninstall, Windows usually protects itself from partial removal. However, that safety net can feel like a wall. A program may keep a background agent running, so Windows locks its DLLs and configuration files. Consequently, the uninstaller cannot delete what it cannot access, and the process may stall without a clear error.
Corruption also plays a major role. If an update overwrote the uninstaller, Windows loses the instructions needed to remove the app cleanly. Likewise, an antivirus tool can quarantine a component mid-update, leaving behind a half-installed state. That broken state often produces “missing MSI” prompts or a loop that returns to the same uninstall screen.
At the RavenSketch design firm, one PC shows the app as installed in Windows Settings, yet clicking “Uninstall” does nothing. Another workstation removes it, but it reappears after reboot because a background service repairs the installation. These patterns point to three common causes: active processes, installer service trouble, or persistent components such as services and scheduled tasks.
It also helps to recognize what “failed removal” can damage. Leftover startup entries can slow boot time, and file associations can remain pointed at an executable that no longer exists. Moreover, “ghost” registry entries can keep Windows offering updates for an app that is already gone. For a business, that means help desk tickets and lost time; for a home PC, it means clutter and instability.
Before any advanced Force Uninstall step, a few safeguards reduce risk. First, confirm the app name and publisher, since similarly named tools can differ. Next, check whether the app stores user data in Documents or AppData. Finally, create a restore point or a full backup if the next steps might include registry edits. This prep work turns frustration into a controlled fix.
With causes and risks clear, the next move is to stop what is running, because a locked file is the most common reason uninstallers fail.
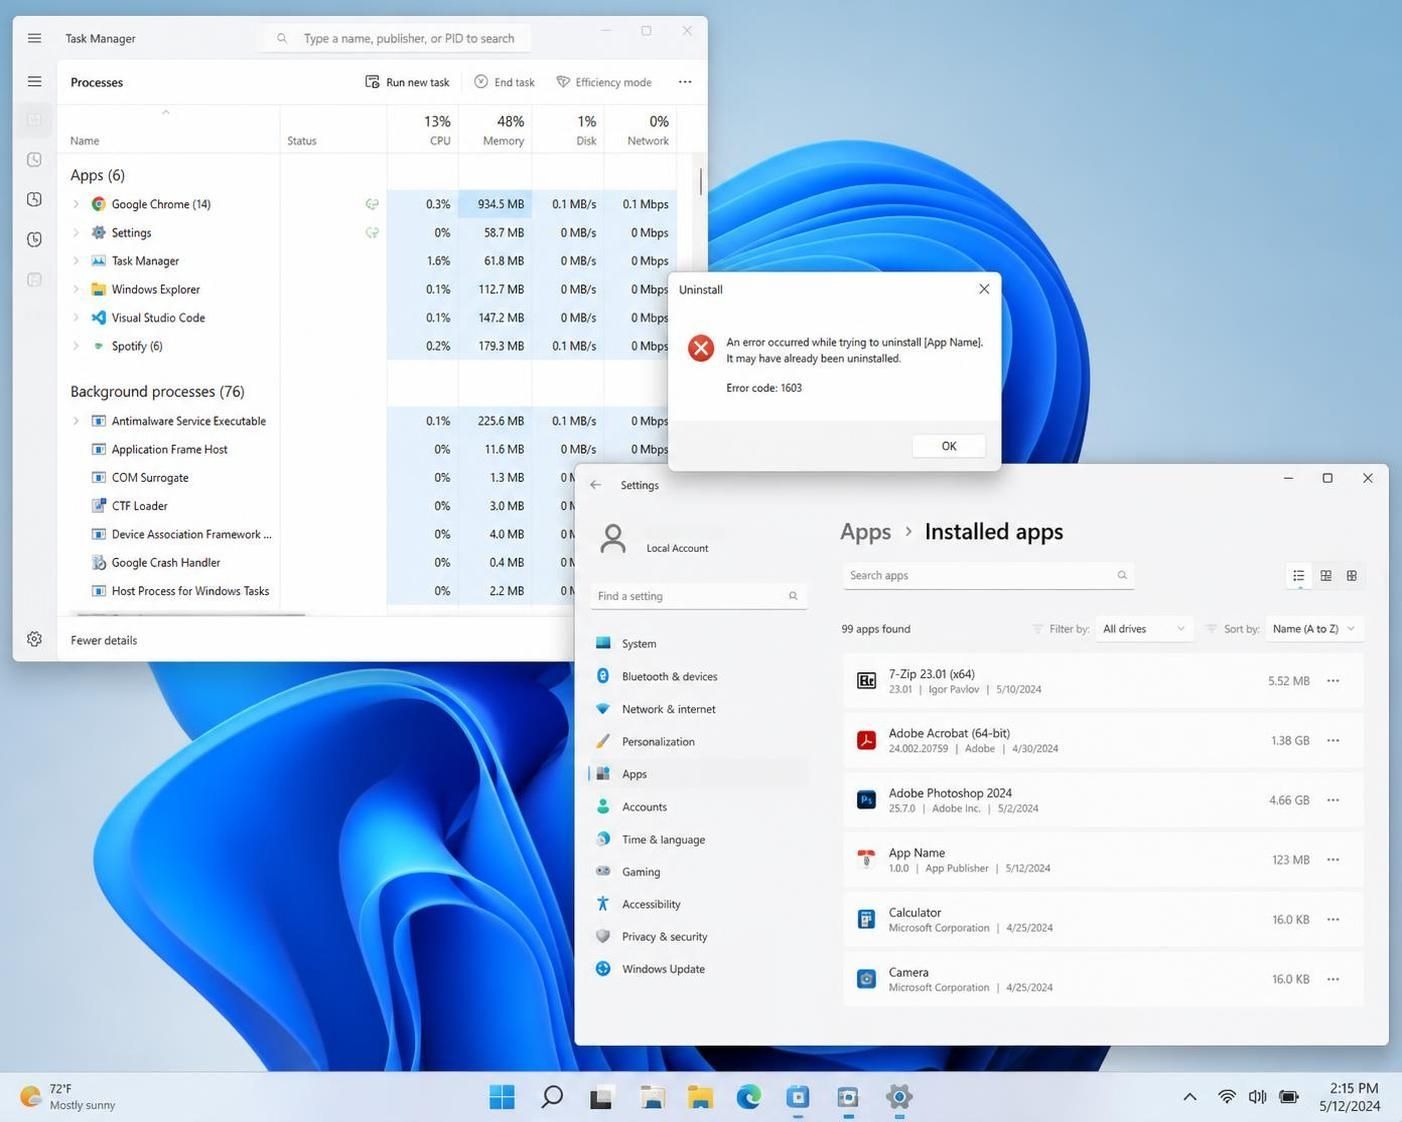
Stop Running Processes, Then Uninstall Program via Windows Settings and Control Panel
The fastest win often comes from shutting the app down completely. Even if the window is closed, background helpers can persist. Therefore, start with Task Manager and end anything tied to the target software.
Quit the app in Task Manager to remove file locks
Press Ctrl + Shift + Esc to open Task Manager. Under Processes, look for the app name, its updater, or any helper module. Right-click each related item and choose End task. However, avoid ending critical Windows processes, since that can crash the desktop session.
If the app embeds into File Explorer, restarting Explorer can help. Right-click Windows Explorer in Task Manager and choose Restart. As a result, shell extensions unload, and the uninstaller can remove previously locked components.
Retry removal from Windows Settings (the modern route)
Next, open Windows Settings with Windows + I. Go to Apps > Installed apps. Find the program, click the three-dot menu, and select Uninstall. If the vendor uninstaller appears, follow prompts and allow elevation when requested.
For RavenSketch, ending the “RavenSketch Update Service” process lets the uninstall complete instantly on two PCs. That simple step saves a full hour of digging.
Use Programs and Features when Settings misbehaves
Sometimes the Settings UI glitches or fails to launch the uninstaller. In that case, open the classic list with appwiz.cpl from the Run dialog. Select the program, then choose Uninstall/Change. This older interface still calls many uninstallers more reliably, especially for legacy desktop apps.
Check for the vendor’s own uninstaller in Program Files
If Windows cannot find the uninstaller entry, look in C:Program Files or C:Program Files (x86). Many apps include uninstall.exe or a similarly named tool. Running it directly can bypass broken shortcuts in Settings. Nevertheless, verify the publisher and location before launching any executable.
When these standard paths fail, the next step is to isolate Windows so fewer services can interfere, and that is where Safe Mode shines.
For a quick visual walkthrough, the video below pairs well with the Safe Mode and Task Manager steps.
Use Safe Mode for Force Uninstall Scenarios Without Background Conflicts
Safe Mode starts Windows with a minimal driver and service set. Consequently, many updaters, anti-tamper modules, and tray agents never load. That makes it easier to complete Software Removal for apps that protect themselves in normal boots.
Boot into Safe Mode on Windows 11 the reliable way
Open Windows Settings and go to System > Recovery. Under Advanced startup, click Restart now. After the blue recovery menu appears, choose Troubleshoot > Advanced options > Startup Settings > Restart. Then press 4 or F4 to enter Safe Mode.
On the RavenSketch machines, Safe Mode prevents the licensing service from starting. Therefore, the program no longer “self-heals” during uninstall. The uninstaller finishes, and the entry disappears after reboot.
Uninstall using Settings or Control Panel while in Safe Mode
Once in Safe Mode, try the same uninstall path used earlier. Start with Installed apps, then fall back to Programs and Features. If the app still refuses, check for the vendor uninstaller in Program Files and run it as administrator.
Know when Safe Mode is the wrong tool
Safe Mode can limit network access unless “with Networking” is selected. As a result, cloud-managed apps may not validate licenses or may throw errors that look unrelated. Likewise, some modern apps rely on Windows services that Safe Mode disables, so their uninstallers can fail for different reasons. In those cases, leave Safe Mode and switch to installer-service repair and Microsoft’s troubleshooting utilities.
Safe Mode remains a clean environment for stubborn cases. Still, when uninstallers depend on the Windows Installer pipeline, fixing that pipeline often works faster than repeated attempts.
The next video focuses on Safe Mode access and common uninstall pitfalls, which helps when a system feels “stuck.”
Repair Windows Installer and Use Microsoft Troubleshooter for Stubborn Software Removal
Many desktop apps install through Windows Installer (MSI). When that service breaks, uninstalls can fail across multiple programs. Therefore, before editing anything manually, verify the installer engine works.
Restart Windows Installer service (services.msc)
Press Windows + R, type services.msc, and press Enter. Find Windows Installer, open its properties, and set Startup type to Automatic. Click Stop, then Start. Apply changes and retry the Uninstall Program action.
This step often fixes errors after aggressive “PC optimizer” tools disable services. Moreover, it can resolve conflicts after security suites intercept installation changes.
Re-register Windows Installer (msiexec) to fix internal wiring
Open Command Prompt as administrator. Run msiexec /unreg, then run msiexec /regserver. Consequently, Windows rebuilds key associations for MSI operations. After that, try uninstalling again through Settings or Control Panel.
Use Microsoft Program Install and Uninstall Troubleshooter
Microsoft still provides a dedicated troubleshooter that targets broken uninstall entries and registry issues related to MSI. Download and run it, then choose Uninstalling. Select the program from the list, or choose Not listed if it does not appear. Follow the prompts until it reports a fix or completes removal.
For RavenSketch, the troubleshooter removes a corrupted uninstall entry that caused “setup cannot find required files.” As a result, Settings stops showing the broken listing, and the machine stops prompting users to repair the install.
A comparison table to pick the right method quickly
| Method | Best for | Where to run it | Risk level |
|---|---|---|---|
| Task Manager + retry uninstall | Locked files, active background processes | Task Manager, then Windows Settings | Low |
| Safe Mode uninstall | Conflicts, self-protecting apps | Advanced startup > Startup Settings | Low |
| Restart/Re-register Windows Installer | MSI install/uninstall failures | services.msc, Command Prompt | Medium |
| Microsoft Troubleshooter | Corrupted uninstall entries | Downloaded Microsoft utility | Low |
| Third-Party Uninstaller | Broken uninstallers, leftovers | Dedicated tool | Low to Medium |
| Registry/Command-line Force Uninstall | Last-resort removal | regedit, elevated cmd | High |
Once the installer ecosystem behaves, a dedicated removal tool can finish the job and clean leftovers. That approach also reduces the need for risky manual edits.
Third-Party Uninstaller Options: Force Uninstall, Deep Cleanup, and Clean Registry Goals
A Third-Party Uninstaller can succeed when Windows cannot. These tools often locate uninstall strings, remove broken entries, and then scan for leftovers. Consequently, they help achieve a more complete Software Removal result than built-in methods alone.
When a third-party tool makes the most sense
If the app’s uninstaller is missing, Windows may show an error like “cannot find uninstall.exe.” In that case, a third-party remover can target the install folder, shortcut, or executable. Likewise, if an app uninstalls but leaves behind services, scheduled tasks, and registry debris, these tools can clean what Windows leaves behind.
At the design firm, RavenSketch leaves a “RavenSketch Helper” startup item even after removal. That helper triggers error popups on login. A deeper scan from a third-party tool catches it and deletes the orphan entry.
EaseUS Todo PCTrans App Management (free feature) as a practical example
One commonly used option is EaseUS Todo PCTrans, which includes an App Management feature that can uninstall or repair certain apps. Open the tool, go to More Tools, and choose App Management. Select the target app and click Uninstall. If the uninstall fails, some builds offer a “Delete” option from a small menu, which can remove stubborn entries and files.
That workflow helps when the goal is speed and a guided interface. However, it still pays to restart afterward and verify the app no longer appears in Settings.
IObit Uninstaller and “force uninstall” style features
Another category of tools emphasizes Force Uninstall modes. These modes can remove programs by pointing to a folder or shortcut, then scanning for remnants. Moreover, many tools create restore points before changes, which adds a safety net.
Regardless of brand, the best practice stays consistent: close the app, run the tool as administrator, allow the initial uninstall, then approve the leftover scan. That final scan matters because it often removes the fragments that keep “ghost” entries alive.
Verification steps after using a third-party uninstaller
After removal, open Windows Settings > Installed apps and confirm the entry is gone. Next, check Task Manager’s Startup apps list for leftovers. Finally, search the Start menu for the app name, since stale shortcuts can persist. A clean result means no entry, no startup item, and no error prompts on reboot.
When third-party cleanup still leaves a broken entry, only then does it make sense to move to manual cleanup and command-line removal.
Manual Force Uninstall on Windows 11: Registry Editor and Command Prompt Without Breaking the PC
Manual removal carries real risk. However, careful steps can solve the worst cases, especially when a listing remains stuck in Settings. The key is to make reversible changes and delete only what is clearly tied to the target app.
Before editing anything: protect the system
Create a restore point and back up important files. Then, ensure the account has administrator rights. Moreover, close unrelated apps to reduce background changes while troubleshooting.
Clean Registry entries tied to uninstall records
Open Run with Windows + R, type regedit, and press Enter. Navigate to:
HKEY_LOCAL_MACHINESOFTWAREMicrosoftWindowsCurrentVersionUninstall
On 64-bit systems, also check:
HKEY_LOCAL_MACHINESOFTWAREWOW6432NodeMicrosoftWindowsCurrentVersionUninstall
Look for a key that matches the program name, publisher, or uninstall display name. Export that key as a backup, then delete it if it clearly belongs to the app. Consequently, the program’s listing should disappear from Settings after a reboot, which helps complete the Uninstall Troubleshooting process.
Remove leftover folders safely
Delete only directories that unmistakably belong to the program. Common locations include C:Program Files, C:Program Files (x86), and user AppData folders. Nevertheless, avoid deleting shared runtime folders such as “Microsoft Visual C++” components, since other software depends on them.
Force Uninstall via Command Prompt (WMIC method)
Open Command Prompt as administrator. Type wmic and press Enter. Then run:
product get name
Find the exact program name, then run:
product where name=”Program Name” call uninstall
Confirm with Y when prompted, and restart afterward. This method typically works for MSI-based installs. As a result, it can remove entries that the Settings UI cannot.
A short case check to prevent repeat failures
After manual steps, confirm that services and scheduled tasks tied to the app are gone. If something keeps reappearing, scan for malware or “bundled installers,” since persistence can signal unwanted software. The goal is a stable machine, not just a missing icon, and that is the insight that separates a quick hack from proper remediation.
What should be tried first when a Program Won’t Uninstall on Windows 11?
Start by ending the program’s processes in Task Manager, then retry uninstalling from Windows Settings (Apps > Installed apps). This sequence fixes many cases because locked files often block removal.
Is Safe Mode useful for Force Uninstall situations?
Yes. Safe Mode loads fewer drivers and services, so many updaters and protection modules do not run. As a result, uninstallers can delete files that were previously locked during normal startup.
How can Windows Installer issues stop Software Removal?
Many desktop apps rely on the Windows Installer service (MSI). If the service is disabled or mis-registered, uninstallers can fail or hang. Restarting the Windows Installer service and re-registering msiexec often restores uninstall functionality.
When is a Third-Party Uninstaller the better option?
Use a third-party uninstaller when the vendor uninstaller is missing, the uninstall entry is corrupted, or leftovers keep returning. These tools often perform deeper scans to remove residual folders and help Clean Registry-related uninstall entries.
What is the biggest risk when manually editing the registry to uninstall a program?
Deleting the wrong registry keys can destabilize Windows or break other apps. Always back up keys before deleting, use restore points, and remove only entries that clearly reference the target program’s display name, publisher, or install path.

With over two decades of experience, I specialize in reviewing consumer software and troubleshooting PC issues. At 52, I combine deep industry knowledge with a passion for helping users get the most out of their technology.